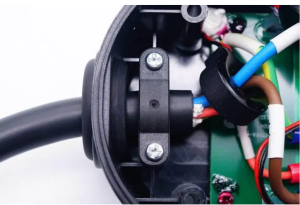
Good job!Step-by-Step Guide to Replace a Home EV Charger Cable:

Tools and Materials Needed
- – New EV charger cable (compatible with your charger)
- – Screwdrivers (flathead and Phillips)
- – Wire strippers
- – Wire nuts or connectors
- – Electrical tape
- – Safety gloves
- – Voltage tester (optional)
The steps to take the installation to new home ev charger cable include the following:
1. Safety First:
– Turn Off Power: Locate the circuit breaker panel and turn off the power to the EV charger. Ensure no electricity is flowing to the charger.
– Verify Power is Off: Use a voltage tester to confirm that the charger is not receiving power. This step is crucial for your safety.
2. Remove the Old Cable:
– Access the Charger: Open the cover of the EV charger. This might require unscrewing some panels. Keep the screws in a safe place for reassembly.
– Locate Connections: Identify where the old cable is connected to the charger. Typically, there will be three wires: live (usually black or red), neutral (white or blue), and ground (green or bare copper).
– Disconnect Wires: Carefully disconnect these wires. If there are wire nuts or connectors, unscrew or unclip them. Note the wiring configuration for connecting the new cable.
3. Prepare the New Cable:
– Strip the Wires: Using the wire strippers, strip about 0.5 inches (1.25 cm) of insulation from the ends of the wires on the new cable.
– Inspect the Cable: Ensure there are no visible damages to the new cable and that the wires are properly stripped.
4. Connect the New Cable:
– Match the Wires: Connect the new cable wires to the corresponding terminals in the charger. Typically, black/red is live, white/blue is neutral, and green/bare is ground.
– Secure the Connections: Use wire nuts or connectors to secure the connections. Ensure that the connections are tight and there are no exposed wires.
– Tape the Connections: Wrap electrical tape around the wire nuts or connectors for additional safety and insulation.
5. Reassemble the Charger:
– Close the Charger Cover: Because of the security consideration , make sure you close all the charger cover firstly . Once all connections are secure, replace the cover of the charger and screw it back in place.
– Check for Secure Assembly: Ensure all parts are securely fastened and that there are no loose components.
6. Test the New Cable:
– Restore Power: Turn the circuit breaker back on to restore power to the EV charger.
– Test Charging: Plug the new charger cable into your electric vehicle to ensure it is functioning correctly. Check for any error messages on the charger or the vehicle.
7. Final Checks:
– Inspect Connections: Ensure that the cable is properly connected and there are no loose or exposed wires.
– Monitor Initial Charging: For the first few charging sessions, monitor the charger and cable to ensure there are no issues such as overheating or intermittent connections.
By following these steps, you can safely and effectively replace your home EV charger cable. Always prioritize safety and consult an electrician if you are unsure about any step in the process.


